Tuesday, September 25, 2012

This is the printed copy after the peer critique. Some of the suggestions included adding a small gradient to the sky, making where the flowers stop less linear, creating variations through flower size, making the branding on the bottom more known and purposeful, making the type larger and possibly adding more to it to draw attention to it.

I have already started work on changing the flowerbed and researching type for the world's fair. 

Seed Packet update

 The piece to the left is what I printed for the peer critique today. This is a completely different direction from what I was trying to do before. I received inspiration from the space Mountain poster below. I thought the style was working very well so, I attempted to apply it to may own work.


 To the left are the other two seed packets in the state I had them in for today. they are the other two packets for the series, two other types of fireworks, horsetail and kamuro. I obviously still need to add the flowers to kamuro and I want to add more fireworks with gradients to both.

Sunday, September 23, 2012

Seed Packet

This is the piece I printed for the critique and got feedback on. My feedback included adding background color and possibly moving the type to the top.

Thursday, September 20, 2012

Firework Video Research


 It was suggested that I look at videos of fireworks to see their progression. These first few pictures are of the effect I am doing for the first packet, comet. Since the colors are the same throughout I am debating about changing the colors to make them more recognizable. This will again bring up the problem of needing a dark background possibly. Also, I am going to look into a tutorial to try to add a shine or glow to the tops.


 The next images show the progression of the other fireworks I plan on doing for the packets, Horsetail and Kamuro. I feel that overall these will be more exciting and take up more space. Fading in and out are very important. In the last few screen shots are pictures of the finale. I thought the amount of smoke and the trails of smoke were visually interesting and I may try to figure out a way to include it.


Different Ideas

 Building off of my last post these are the different ideas I am working through to make the packet itself more exciting. I am also exploring paper.


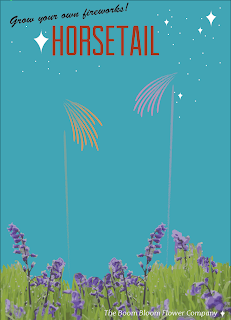
I was trying to create a night sky feel to the top through the gradient. I enjoy the addition of color but, I feel that it is not enough and I am not sure where to go on this one from here.


Originally, I was exploring pattern I just did not include it in the print out because I am not sure that it is working yet. I definitely feel that it gives a playful and firework-like feel but, even at this low opacity I feel like the pattern is competing too much with the flower and fireworks.


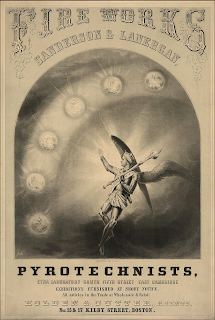
When I was researching I found the poster/advertisement on the right and was inspired by it. I think that the interesting typefaces with help to take my design to the next level. This idea is in the very early stages. I still need to track out type, make revisions and look for paper.0
This is a screenshot of what I printed for the critique. originally I was going for a clean cut look but now I feel that that does not represent fireworks well. So now I am exploring ways to make the background more exciting and ways to render the fireworks better.

Thursday, September 13, 2012

Seed Packet POV

After doing research for images and information and creating my mood board I have a rough idea of how I would like to design my seed packet. The three different packets will be three firework effects; crossette, kamuro, and horsetail. I chose these three based on their visual appearance and how different they are from one another. The typeface I am leading towards right now is Desdemona for the headlines. I am planning on having an underlying texture/pattern throughout the piece, possibly something similar to the patterns included in my mood board. My overall concept is that one would plant the seeds in the packet and a flower that looks similar to the packaging would bloom. Once it was fully bloomed it plays off the he loves me, he loves me not idea in that when one lights a petal a firework will shoot off. If someone were to sent off all the petals a fireworks show would essentially occur. I am still working on company names but I have ideas like Bloom Blast Company, Blast Bloom or Blast Garden.

Firework Mood Board

This is the mood board I created for my firework seed packet idea. I researched all the different firework effects and found three that had interesting shapes that I felt I could work with, the Crossette, Kamuro, and Horsetail. From there I found pictures of all the types using google and my own pictures of Disney firework shows. Then I found illustrations and art of fireworks to see how they are rendered, for example through shape or expressive line which will help me in deciding how I want to render my packaging. Finally I found swatches that reminded me of fireworks like, dark blues of the night sky or brilliant pinks and purples of the fireworks themselves.

Tuesday, September 11, 2012

From the mind map in the last post I broke off and made another one. At the center is Disney and from there I broke off and built upon the fireworks path. Now I am doing research on types of fireworks.

Mindmapping for Seed Packet Project

This is the mind map I created in class today. From seed packets I thought of sun and that is the path I am continuingon for brainstorming.


Mario Mushroom

Creating this mushroom was my first time ever using the mesh tool. I orginially had trouble with joining the points together, but once it was explained I understood, and applied it to the rest of the piece. I feel that the body of the mushroom is more successful than the top. Going from the dark black to the light pink on the cap made shading very difficult because of the amount of shades needed inbetween. I continued to struggle with this throughout the piece which is why it still looks choppy. 

Monday, September 10, 2012

Illustrator CS6 Essential Training


CMYK stands for cyan, magenta, yellow and black and these colors are used for all print documents. RGB stands for red, green, and blue and should be used for web projects. The fill and stroke are located in the left tool panel. Once an object is selected the fill and stroke on that particular object will appear and from there can be manipulated. All vector artwork created in Illustrator are made up of paths. Paths are nothing more than line segments. While, anchors are endpoints for these line segments. If an anchor looks full than it is selected, while if the anchor is white inside than it is not selected. The handles on the anchors tell the path how to curve depending on how they are pulled.  When creating a shape utilizing the arrow keys allows one to add and subtract from the shape or open path. To join or average points one would go through the object menu, down to path then select join or average. The scissor tool cuts paths using anchor points while the knife tool is less accurate and tends to create a curvy line, to make the cut more accurate hold down Alt/option to create a straight line.

Sunday, September 9, 2012

Logos Exercise

I did the right column of the logo tif. I used the pen tool and bent the curves as needed. After I used the pen tool I cleaned up some of my curves using the smooth tool. In my opinion the logo I had the most trouble with was the chili's logo.

Sunday, September 2, 2012

Illustration CS6 Training Summary


Illustrator is a vector based image editing program. Images created within it can be infinitely expanded because they are not pixel based.  Raster based images become pixelated once expanded but this format may be needed for web or tablet based projects. In the touring the interface video he explained many of the tools, menus and shortcuts within the illustrator program. In the using rulers, guides and grids video he explains where to find all of these option in the menu and how they can be manipulated. Locking and hiding artwork can be done through the object menu or the layers panel. Artboards can be used for a multi-page document or for pages from the same project so they can all be saved in the same place. The direct selection and group selection tool can be very beneficial when modifying artwork. Grouping and ungrouping objects can be helpful when scaling or rotating and can be done through the object menu. The shift key is very important in scaling artwork so the piece stays proportional. The shift key can also be used to achieve precise rotations. Aligning objects allows each piece to be viewed equally.